


I hate my desk. OK I don't hate it, but I want a white Pottery Barn desk. So my big dark corner desk just is not cutting it. There is no way I'm getting the PB desk (have you seen the price?) so I'm working on brightening up the desk I have. There should be a big reveal by Friday (I'm very excited).
One element to my desk that I have been working on is having a bulletin board on it. I could not find one I like, so I made my own. I love how it turned out.
This is how I did it.
Supplies:
 Cork bulletin board
Ribbon
Scissors
Fabric
Batting (for padding)
Staple Gun (love my staple gun)
Thumb tacks (I found decorative one, but you could also paint them)
1. Cut the batting to size and staple to back of bulletin board. I channeled my inner art school student and stretched the batting in opposite directions. (Meaning I did one side then the opposite side and went back and forth, does that make sense? It's like stretching a canvas, you don't want to just go around in a circle it will be uneven.)
 Be sure to get the corners nice and tight.

2. Did the same with the fabric.


3. Add the ribbon. I lay it out first so I got the spacing right then tacked it on.
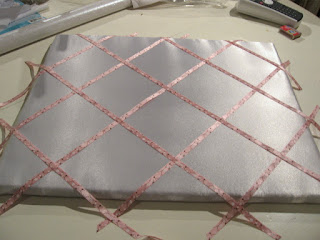
4. Tack the ribbon to the board using thumb tacks. (Fabric covered ones would be nice but I found some around the house that worked just as well)


5. Staple extra ribbon to the back of board.
You're done!

 There are tons of possibilities for the color of the fabric and the ribbon, and even the tacks. I want to make a million of these now. It was so easy. Wait 'till you see how it looks on my desk. I'm so excited!


 |
| Messy and dark, not so good for craft inspiration. |
One element to my desk that I have been working on is having a bulletin board on it. I could not find one I like, so I made my own. I love how it turned out.
This is how I did it.
Supplies:

Ribbon
Scissors
Fabric
Batting (for padding)
Staple Gun (love my staple gun)
Thumb tacks (I found decorative one, but you could also paint them)
1. Cut the batting to size and staple to back of bulletin board. I channeled my inner art school student and stretched the batting in opposite directions. (Meaning I did one side then the opposite side and went back and forth, does that make sense? It's like stretching a canvas, you don't want to just go around in a circle it will be uneven.)


2. Did the same with the fabric.


3. Add the ribbon. I lay it out first so I got the spacing right then tacked it on.

4. Tack the ribbon to the board using thumb tacks. (Fabric covered ones would be nice but I found some around the house that worked just as well)


5. Staple extra ribbon to the back of board.
You're done!

 |
| (I hope this card does not offend anyone, I had to add it in) |


found you from the follow along, i love your memo board. I'm a new follower now, can't wait to look around!
ReplyDeleteHi, Chance! Your bulletin board looks classy and sassy :)
ReplyDeleteBy the way, we have a Swap Followings Linky Party going on right now where you get to meet excellent bloggers and increase your followers in the process. It's easy to join - just whip up a post and include the party button in the post then link up and start following other bloggers in the party so they can follow you, too. I'll be honored if you party with us at http://www.homemakeronadime.com/2011/03/swap-followings-linky-pary-030711.html. See you there :)
There a lots of fabric covered boards out there, but yours really stands out to me because of the batting and wrap-around look-- makes it look much more polished. It looks like something you'd find in a store! I featured you today on my favorite things :)
ReplyDeletehttp://sunshineandchaucer.blogspot.com/2011/03/my-favorite-things_07.html
oh and that "damn right I'm good in bed" one made me laugh out loud! Too funny!
very pretty =)
ReplyDeletewhat a great addition to the office!
ReplyDeleteI am hosting a giveaway from hair candy for girls.$15 store credit that lets you select flower clips, ziper clips, pettiskirts, bottle cap necklaces and more from the store.
Check it out
http://houseonashwelllane.blogspot.com/2011/03/15-store-credit-giveaway-from-hair.html
So pretty! I love the ribbon you used.
ReplyDeletei love these. just one for thing i want to make! you did a great job, looks store bought to me. thanks for sharing it at my party! xx
ReplyDeleteI'm so glad you came to link this up, i thought it was so pretty when i was going through your blog the other day! :)
ReplyDeleteI love this! I have this exact ribbon and a canvas board. Just need to get some beautiful shiny material. Thanks for posting this! I found you at Naturally Me Creations
ReplyDeleteLooks amazing!! Thanks for auditioning for OMTWI!!
ReplyDelete