Friday, July 20, 2012
Book Club Party
Posted by
Unknown
As you know from my post here, I hosted a book club party. It was the first one. Now, one month later I am furiously reading my next book because we meet on Sunday.
I thought it was high time I showed you all my hard work.
We read Middlesex, by Jeffrey Eugenides. It was actually a great book. The one mistake I made was to chose such a long book for the first choice. In the future I might have been smarter to ease our way into such a long book (over 500 pages). Otherwise, it was a great book. Out of the three of use who attended, only two read the book. But we had fun. I'm hoping all three, or maybe even four, of us will have read the next selection (Abraham Lincoln, Vampire Hunter).
For eats I made the little appetizers above. They were taken directly from Pinterest.
Quiche and salad were the main food for the night. I was expecting a friend who just got out of work so I knew she would be hungry.
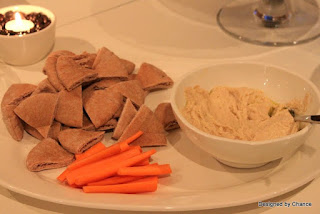
For another snack, I had homemade hummus (I love me some hummus), pita and carrots.
But for my parties, the showstopper is always the dessert. I made a Strawberry Cream Cake from a recipe I found in Martha Stewart Living. Here is the link to the recipe if you ever want to make it. It is hands down the BEST strawberry and cream cake ever. The cake part is amazing.
I also made Pink Grapefruit Margaritas from a Ina Gardner Recipe. That was yummy too, but did not photograph well (I should have tripled the recipe for the pitcher, but we would not have been able to drink all that anyway.)
That is my little party. In truth, I may not go to all that trouble again. I might just open a bottle of wine and and put out some cheese and crackers, because really, the most important part of the book club is talking about the book.
Wednesday, July 18, 2012
Drink Theme Gift Basket
Posted by
Unknown
An old friend of mine got married a couple of weeks ago. For her wedding gift, I did not want to do something normal and boring. I wanted to give her something that would remind her how important she is to me.
So I took my crafting skills to the test and made Jolly Rancher Vodka,
and Cocktail Napkins. To round out the gift I also added some store bought gifts. This post is all about the finished product.
I started with a huge ice bucket for parties. I love these large buckets, this one even has a bottle opener on the side (how great is that?)
I also bought a real ice bucket that is insulated and matches with the theme of red and white.
Then, to top it off, I added a drink shaker so my friend can make her own drinks.
I wrote cute little labels for each item (just in case she does not know what they are, yeah right!) and included the button from my blog.
I put it all inside the large ice bucket, wrapped it in cellophane and brought it all to the wedding.
My friend was so excited she messaged me the night she opened it, this is what she said:
We just got home and opened your gift and I wanted to message right away to say that it was probably the best gift! W are really looking forward to trying your flavored vodkas! It was such a thoughtful gift and so much effort!
That was all the reward I needed.
I love giving handmade gifts. Every year I plan to make gifts for Christmas but never get it done. What are your favorite gifts to make?
Friday, July 13, 2012
DIY Cocktail Napkins
Posted by
Unknown
As I promised, I am continuing my little wedding gift series of tutorials. On Monday I posted the Jolly Rancher Vodka and today what would go better with flavored vodka than little Cocktail Napkins?
These napkins were made from a dish towel. I loved the fabric of this dish towel and, to tell the truth, I am not a fan of most fabric in my local fabric stores.
Cut your fabric about 6 x 12 inches. I just used the size of my measuring thing (my high school teacher always told me never to use the word "thing" - sorry Don).
Fold the fabric in half with the front side in.
Sew up the two sides that do not have the fold or the opposite of the fold (you want to be able to turn it right side out). Make sure to leave space at the open end.
Shear your sides that you just sewed up.
Turn the napkin right side out and tuck in the open edge. Make sure to poke in the corners so they are square.
Sew all the way around the napkin with a bright thread. I sewed it about a 1/4 inch from the edge.
Next, mark the corners of your more showy stitch (ok it is just a zigzag, but hey, I can pretend to be fancy). In the image above, I marked the zigzag stitch 1 inch from the first, but I changed the rest of them to 1/2 an inch. That looked much better. My poor friend has one napkin with zigzag a little different from the rest (that way she knows I made it, haha).
Stitch to the little pencil marks you made (see above) turning on the little pencil spots (I'm watching a British shows and starting to use more British words).
Tie it up with a ribbon and you have a great little present.
This is a easy project for beginner sewers. Just be sure to sew in a straight line. Mine are not perfect I have to admit. I'm kind of a beginner myself.
Wednesday, July 11, 2012
House Cleaning Tips from 30 Years of Experience
Posted by
Unknown
This post has been six months in the making. Finally, Janel over at Hating Martha encouraged me to write this post. So here goes.
I worked as a house cleaner for all of one month. In truth, I'm too educated to clean houses for a living. I just felt that I was not using my expensive education to do the grunt work of cleaning other people's houses all the time. Also, it was really hard work, for not very much money. So I went back to subbing.
While I was house cleaning, I got a lot of great tips on how to my boss cleaned the house. She has been a house cleaner for 30 years and we had it down to a science. I'm pretty sure she knew what she was talking about.
1) Have all your supplies in one bag. We used two paper bags nestled inside each other. That way you can put your wet gloves and sponges between the bags to dry.
2) Have a paper bag for garbage (or sometimes, because we don't have many paper bags - I recycle - I just take my little garbage can around) and your roll of paper towels. My boss would tear off the paper towels by two sheets and layer them, but I don't find this helps much.
3) As Janel recommends, start at the top of each room and clean down. We had a feather duster for the ceiling, then counter-tops, sides of furniture and cabinets, and the floor last. As soon as I learned this I realized how great this tip was. As the dirt falls you can clean it up. Brilliant.
4) Because people tend to straighten up before the house cleaners come over, I do that first in my house. I run around the house putting stuff away and generally straightening up. I try to do this every day even if I can't clean. I don't use baskets or anything because I use the process of straightening up as extra exercise. the more times I run up and down the stairs the better shape I will be in (right, makes sense?).
5) Unlike Janel's house cleaning plan, I always start with the kitchen, as suggested by my former boss. The reason for this is that the kitchen is usually the dirtiest room in the house so it is good to get it out of the way.
6) I like to use all natural cleaners, but it all depends on my mood. I have tried a lot of different cleaners. Shaklee, Myer's, Vinegar, Baking Powder, Bleach, you name it. So far I like Ms. Myer's Geranium spray and Pledge (citrus scented).
 |
| {source} |
Both these cleaners make the whole house smell wonderful.
7) The Pledge is great for so many surfaces and dusting. I learned to use it on the cabinets in the kitchen. Kitchen cabinets do need a wipe down and a little pledge and elbow grease makes a big difference. I also use the pledge on all wood surfaces and leather. Everything sparkles with pledge (and smells good too!).
8) As you move from room to room you bring your bag of cleaning supplies, garbage bag, mop, and vacuum along with you. I start in the kitchen and work through the house. The only problem with this is that I usually lose steam by the time I get to the last two rooms, the bedrooms. I figure I can just close the door if I have to and hubby and I don't care if it is not too clean.
9) Things I don't clean: windows, inside light fixtures and walls. I really should clean my windows but it is just too much work. You know, remove screen, get ladder, spray, wipe ... ugh, it is endless. Every morning I wake up and look out my dirty skylight and think "I should clean that!" but I don't.
Oh and last but not least....
 |
| {source} |
I hope these techniques are helpful, they work for me. If you are a long time follower, you will know I posed a plan for housecleaning over a year ago, but it did not last. It is a good plan, but hard to execute, because some days you just don't like to clean.
How do you clean?
Monday, July 9, 2012
Jolly Rancher Vodka by Chance
Posted by
Unknown
I love Weddings. I missed a bunch of them while living in India and now make every effort to attend all the weddings I do get invited to. So when my old friend from Scotland told me she was celebrating her new marriage I convinced hubby to drive 9 hours to attend. We had such a blast. I knew I wanted to give her something special, so I dug deep into my creative psyche and made her a gift that was designed especially for her. It was Designed by Chance (ha, had to throw that in there).
I will be sharing all the crafts I made for this special gift over time. Today, as the title indicates, I will show you how I made Jolly Rancher Vodka.
Nothing could be easier than Jolly Rancher Vodka. I used the tutorial found at Mix that Drink but used cheaper bottles (they still look great, I think).
First we separated the Jolly Ranchers by flavor. Hubby helped with that.
Then just put 9 Jolly Ranchers in each flask (the flasks I bought were 7 ounces).
Add vodka:
Then wait for the Jolly Ranchers to break down and flavor the vodka. I added hand made labels with my blog logo and the flavor on the back. It was all tied together with baker's twine in my friend's wedding color (red).
Put all together, they looked amazing.
Now, of course, I made myself a batch as well. I can attest that the flavor is really nice. Not too sweet.
Be sure to check back for some more tutorials and all the other components of the gift.
Do you like to make handmade gifts or go with the registry? In this case, there was no registry, so I didn't have to make that choice.
Subscribe to:
Posts (Atom)
