Sunday, December 30, 2012

Christmas Cookies


"Christmas cookies are like the zucchini of December," said a good friend who helped me make all these cookies.  I sent her home with a couple boxes, and kept most of them (because I had more things to do with them, hence the quote).  In truth, I didn't have too much trouble getting rid of my share.  I gave a bag to each friend I saw one night, as well as to a party.  Hubby took a bunch to his friend's party and they were gone.  In fact, we didn't have enough.  Next year, I might have to make more.


My friend and I made five different kinds of cookies: gingerbread, sugar, jam sandwich, peanut, chocolate, and Mexican Wedding Cakes.  They were all great.  I think the sandwich cookies won my vote for the best.  They had jam in the middle and looked amazing when finished.  Somehow I didn't get a photo before they were all gone.


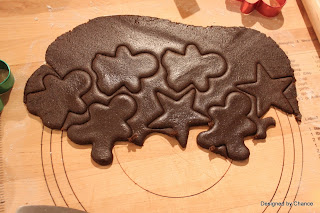
The gingerbread dough was brought by my friend.  She made this recipe from her family coffers, it is actually for a ginger bread house, but we made cookies and made sure they were kept in air tight containers so they didn't get too hard.  We had so much fun decorating these guys.


We also made the traditional peanut butter cookies with Hershey kisses.


These cookies are SO MUCH fun to make.  I loved pressing in the kisses right at the end.  Next time I will have to be careful not to mix the dough too much (I got a little mix happy with the stand mixer.  Can I just tell you how much I love my stand mixer?  It is amazing, and it made making all these cookies so much easier.).


These Wedding Cookies melt in your mouth.  They are so good.  I tired to make them more round, but that did not work.  To speed up the sugar coating step I put them in a big zip-lock bag and shook.


We took a break for some egg nog and rum.  This is a very important step.


This is the only picture I have of the sandwich cookies.  I sprinkled the top ones (with the holes) with powdered sugar and put a bit of jam in the middle.  The jam shows through the window.  They look great.  They were also so yummy.

Organizing a Cookie Party

Lots of people host cookies swaps, but I like to host a cookie baking party.  There is something fun about actually making the cookies together and decorating them with a friend.  Just be prepared to spend a long time cooking.  We took six hours.  

I had my friend bake a couple double batches of her favorite cookie dough.  I did the same.  A third friend was supposed to come but could not make it at the last moment (this is the story of my life this year).

I provided the icing and sprinkles.  My friend brought some decorating supplies too.

I did have a plan to make chicken soup and have it ready for when we needed to eat something besides cookie dough, but this fell through after the first cookie party date was canceled because hubby was sick.  So instead we had re-fried Chinese food (it was still yummy).  Point is (I'm getting there), having snacks are a good idea.

Drinks are also good.  We had egg nog, water, and apple cider...and tea, I always have tea.  

Finally, have boxes and bags ready for the end of the party.  You want your guests to have a way to take all their hard work home.  Next year I plan to head to the dollar store and buy a bunch of tins.  I did bags this year and they just don't keep the cookies fresh.  

So, instead of swapping cookies and making them home alone, bake some with a good friend and have some fun.  

I gave a bunch of cookies to some friends who are bachelors and don't get a lot of home baked goods.  They were so happy to have a nice little gesture from me.  It felt really good to share some Christmas cheer.     

So have cookie party and spread the cheer...next year.  
Wednesday, December 12, 2012

I Love Olioboard


First it was blogs, then Pinterest, now Olioboards.  I love making design boards for various rooms I want or dream of.  I could spend all day making them, and some people have.  I'm just beginning to stretch my design  imagination.  There are so many possibilities.

Olioboards are great because you can upload any picture you want and use it on the board.  I know many people make design boards on PhotoShop, but that program is so confusing for me.  I'm really quite overwhelmed by PhotoShop.  The Olioboard software is super easy to use and understand.

Now, I have an ulterior motive for introducing you to this great little website.  I want you to vote for my designs (hehe).  Go HERE.  Just be warned that they make you create a user profile.  I know I'm not going to win, but if you like either of my designs which I submitted to the current contest, please head over and vote.  Or not.  That is ok too.


While you are there, you could also follow me.  But, to be honest, I am more interested in creating boards than having followers.  These are all my boards so you won't see anything new right now, but it is a fun site if you are a creatively inclined.


Have you heard of Olioboard?  Do you use it?  Would you use it?

I really want to take a design course at the local Community College, but I'm afraid they will make me use paper and glue.  I hate the idea of making design boards in real life, I only like to make virtual design boards.

Monday, December 10, 2012

Designed Guest Room


I'm not a very consistent person.  I like to live in lots of different places.  I like to eat lots of different food, and, I like to decorate with lots of different colors and styles.  So just as I get my house settled into one style or color scheme I usually change my mind and want something totally new.  It drives my husband crazy, but I think it is also why he loves me.

As an historian, this reminds me of the Victorian era, when it was the style to redecorate all the time.  It was a symbol of affluence to have the most updated interior design.  I'm not sure much has changed, actually.

My newest obsession is with grey, teal and white.  My husband teases me that any time I want to change something I usually just paint it white.  He is right.  Right now, I want everything to be white, clean and modern.

So when my in-laws got a new house and told me I could decorate the guest room any way I wanted, I felt like I had just won the in-law lottery.  What fun.  I get to design a room just as I want, and I don't have to pay for it.  I'm so lucky to have such great family.

I knew I wanted something light, airy, clean, and calm for the bedroom we were going to sleep in when we visited.  We got the white furniture at Ikea and the bedding at Bed Bath & Beyond.

With all that set, I decided to make a design board for the rest of the room.  That is what you see above.


The bedding has a bit of off white to it.  I have since seen some bedding I prefer (see, changing already) but that is just unreasonable to change the bedding after we have used it a total of twice.  I'm not that crazy, I swear.


This dresser is huge, and now I want one for my own house.

I decided I wanted to add a pop of color.  The color of my new dress was just what was needed.


The walls are a blue/grey color.  I love them.  I'm not a big "white wall" person.  I think white walls are boring and uninspired.  That's just me.

I figure I will do the artwork myself.  I really like the idea of four canvases with a damask design on them.  I also plan to make the headboard.  I made one for my own guest room (here, and here) so why not for the in-laws?  I'm really looking froward to making a headboard with some nail hardware edging.  It should be fun.  There are a lot of great printables I'm also thinking of framing to add color and interest.

So, I have my work cut out for me.  Not sure when 'm going to get this all done, but it will be a fun side project.

Do you change your style preferences or are you committed to a color/style and stick with it?

Thursday, December 6, 2012

DIY Wine Tote: AKA Booze Bag


A dear friend of mine had a great bag.  She was shopping for wine in Canada and when she got to the register she discovered that the store did not provide bags, you were expected to bring your own.  Lucky for her, and her husband, they also sold reusable bags for $2.  So they bought a four wine bottle reusable bag and went back to their hotel room with four bottles of wine and a great little bag.

When I saw her Booze Bag, I thought: Now that is a good idea, I want one.

So we got together, got out our sewing machines and got to work.  Now, I'm not a great seamstress.  My mom taught me how to sew a straight line, gather, and top stitch.  Everything else I have learned on my own.  But my friend, she is great, she can sew just about anything she sets her mind to.  So, she helped me make my own Booze Bag.

Six hours later, and two glasses of light egg-nog, and we were done.  We figured it was probably cheaper and easier to drive to Canada (five hours from here) and buy a Booze Bag next time.  But, we did have fun.  Now we have two matching Booze Bags in these fun colors and I know how to do it again if I ever want to.

I didn't bring my camera, and we didn't even think to record our steps until half way through, but this may help you if you are further away from Canada, or just crazy enough to try.  

How to make a Wine Tote (or Booze Bag)

Materials: 

Fabric, not much more than a yard or two, you can also use two differnt kinds of fabric like we did (I used a large defective Ikea pillowcase and got two bags with a separate piece of fabric for the interior and handles)  you can use your scraps for this, which is great, because you don't need a lot of large pieces.

General Sewing Supplies (you know ... thread, needles, pins, scissors)

Patience (bring lots of that)

Steps:


1.  Cut two side pieces (like image above) 14" x 9 1/2" (this includes a 2" seam allowance at top and 1/2" at bottom).  The side pieces are curved on the bottom.  Then cut one long rectangle to attach them, 7" x 32" (includes a 1/2" seam allowance on sides and a 1" seam allowance on the short ends).  It has to be the full length around three sides of the smaller, rounded side pieces.  You will end up with a bag with two pieces on the side and a long band in between.


See how the side pieces are flat and they are attached by one long piece?  The rectangle piece goes from the top down, along the bottom, and back up.  I'm not sure how else to explain it.  Hope that makes sense.

2. Sew the top of all three pieces over twice.  That means for the long rectangular piece you will sew both short ends.  Top stitch along the folded edge and the other side of the folded fabric to add strength.


3. Make the handles by cutting a two inch wide by 16" length strip of fabric.  Sew together with front of fabric facing inward along the length of the fabric and turn right side out.  Then top stitch both edges just like above.

4. Pin handles to the inside of each side of the two curved pieces.


5. Stitch handles with "X" pattern.


6. To make the dividers in the bag, cut two rectangles of fabric about the size of your smaller (rounded) pieces 11" x 10".  Finish the top and bottom of these pieces.  We added a decorative stitch at the top for fun.  Then pin the two pieces together and stitch right down the middle.  The dividers do not attach to the bag at the bottom, so they can be shorter than the bag itself.


Now comes the hard part.

7. Pin the long rectangle piece to the two smaller side pieces with one edge of the divider fabric in between on both sides.  Make sure you have the correct flap of the divider fabric attached to each side of the curved outer bag fabric.  In the end you want an nice "X" dividing the bag into fours with the complete divider fabric parallel to the wider side of the bag. You will be sewing three pieces of fabric together at this point.  Be sure to gather some of the long rectangular fabric as you go around the curved edges.  You will be pinning the long rectangle along three sides of the smaller piece, and the divider fabric alone the two edges.


We pinned one side, then sewed it.  Pin and sew the front of the fabric facing outward.   You will later cover the seam with fabric so it is ok that you will have the seam on the outside of the bag.  Then we pinned the next side and sewed that side too.  At this point the shape of the bag will be complete.

8. Cut a strip of fabric 34" long and 1 1/2" wide to cover the exposed edges on the outside of the bag.   Fold both long edges inward to create about a 1/4" or 1/2" "cover" to go around the exposed edge.  Iron these folds in place, it will help.  If you do not have a long enough scrap of fabric you can cut multiple strips and sew together by cutting the strip at a 45 degree angle and sewing together.

9. Sew your edging over the exposed seam with a top stitch.  We cut off any extra fabric outside the seam of the bag to make as much room as possible for the "cover."  We only had a 1/4" edging so it was very tight.  Needless to say, my friend did the sewing on this part.  Sew this top stitch as close to the inner edge of the seam cover as you can.  We literally had about 1/16" space between the stitch and the edge of the seam cover.  In the name of ease we left the top of the "cover" edging raw.  You could also fold it inward and stitch it closed. (I know there is a name for the cover of the bag edge that I am describing over and over again, but I just can't think of it or find in on google.  That is the problem with google, if you don't know the name it is very hard to find it.)

10.  Cut any stray strings of thread and admire your handiwork.  We had to go back and sew any spots where the stitching strayed from the covering edge.


I really want to make more of these.  I might alter the height and make one for the glass milk bottles I buy (from a local milk company) and need to return weekly.  The pockets are big enough that you can fit more than just wine.  Need four half gallons of milk or juice?  It will fit.

What do you think?  Is the United States ready for liquor stores to stop giving out bags?  Do you use reusable bags or is it too much trouble?  (We often forget them at home, hehe)
 
Blog Design by A Mommy's Blog Design (© Copyright 2011)